Saturday, September 08, 2007


I'm participating in a Poem RR with a group of friends. The cover is pictured on the left. The theme of my book is The Moon and Stars. One reason I choose that theme was the art doll idea that has been floating around in my head for a while. Once I started my book, I decided to go ahead and create the doll. I finally finished it last weekend. When my book returns, I'll display them together. The doll is polymer clay and the moon is a tin foil base, covered with DAS brand air-dry clay.


Three friends, Tricia, Lisa, Vicki and I decided to do an art doll round robin earlier this year. Each of us choose a theme and did our faces and bodies. Tricia choose Air, Lisa's was Celestial/Gems, Vicki went with Forest and I choose Water Sprite. We would meet once a month at one of the quaint little wineries or restaurants in downtown McKinney to exchange our dolls and visit. I have pictures from three of our meetings, 1st, 2nd & 4th. The dolls all turned out fabulous and we will definately be doing this again.

One of art egroups that I belong to issued a challenge - Ornies. The rules for the ornies are they cannot be bigger than 7 inches, must be able to be hung and have to be created from a premade doll. I got some small (5 3/4 inch) porcelain dolls from the dollar store as the base for my ornies. I used butterfly wings that I had purchased at Michaels. I had so much fun doing these.

Sunday, August 19, 2007


After taking Lisa's class, I was excited to use the technique to create another doll. This was another face I had sculpted and set aside, not sure what to do with him. I'm not sure why it is, but it seems like when I sculpt faces, they turn out to be male more often than not. I'm always pleased with the faces, but am challenged to come up with the rest of the doll to go with the face.

This face had a little bit of arrogance about it - and needed a pose to match. It took a little bit of engineering to come up with the pose using the method I learned in class. I did learn from this doll and I would do a stronger, longer support on the next one.

I had the pose and finished him and dressed him similar to Serenity, but I wasn't pleased. My friend Vicki was over (she is excellent with costuming) and I asked her what I should do for him. We went to my fabric stash and she made her suggestions. I took off the original clothes and redressed him as you see here. Voila! perfect. A piece of feather boa in rust became his hair, a dried pod with a feather made his hat. He holds another dried pod in his hand and a curly gold staff.

I'm very lucky that my friend, Lisa Renner lives nearby and I'm able to take classes from her. She taught a Stardust Fairy Class for our local polymer clay guild in June this year. Lisa makes taking a class such as pleasure, not only due to her abilities as an artist and teacher, but also the preparation work she puts into every workshop she teaches. The workshop was a full day and we were able to go home with a completed fairy doll. My doll is called Serenity, as her face suggests.

When Patricia Rose offered lessons through her guild program, I immediately signed up. I was very excited to learn from such a great sculptor. I signed up as soon as I found out she was offering the program. I was definately intimidated when I received the first lesson! It was a full body sculpt - of the classic Venus - in other words, a nude. No chance of any clothing hiding any mistakes.

I bravely proceeded, printing off her step-by-step directions. I began sculpting the face. When I finished the face, well, it wasn't Venus. In fact, it wasn't even female - but it was a fabulous face and I really liked it. It was too good to smash, so I set it aside and began sculpting the Venus face again. The second face was better (it was female at least) and I did finish the whole sculpt. All I can say is that it was a good first piece, but the only resemblance to the orginal Venus were the uplifted arms and standing on a seashell. I have it in my studio on a top shelf, but I would never post it. I did, however, still have the orginal face still staring at me, wanting to be completed.

I sculpted a body to go with the head and Tristan was born. He dances through the forests, clothed in leaves. I'm very pleased with the way he turned out.

Sunday, July 29, 2007


The second piece I worked on while I was away is another bracelet, this one with the remaining frog beads to match the necklace I did previously. I did a peyote stitch base and added the frogs, leaves and flower beads. It isn't finished as I haven't decided what to do about a closure. The piece is rather heavy and I'm afraid a button closure will work loose with wear.


As I've mentioned, when I travel, I bead. I recently went to Rhode Island for my annual artist getaway with fellow artists. I did the base of this bracelet prior to boarding the plane and beaded during the flight. One of the airline attendants was a beader, so she was very interested in my piece. She said that she only did simple beading. This bracelet was inspired by the silver fish beads I bought at the Bead Renaissance Show in May. I wanted the fish to appear to be swimming through the grass & moss.

One of the egroups I'm a member of issued a challenge - Dolls with a Secret. This sounded like something I could have fun with, so I started to brainstorm. I'm not sure why butterflies in her stomach came to mind, but it did. I had fun creating this doll.

Wednesday, July 04, 2007

Last week was another road trip - my stepson graduated from Army basic training last and we drove up to Fort Sill (Lawton, OK) to attend Family Day and the Graduation Ceremony on Thursday & Friday. As I had already finished the mermaid necklace, I needed to find another piece to make. I was working on a couple of birthday presents and needed accent beads for them, so I looked in my lampwork box. I found those beads (and finished those bracelets), but I also pulled out two sets of beads I bought when my friend, Debbie Givens first started making lampwork beads. I added some glass beads that had gathered at various conventions and created this piece, which I finished yesterday.


My friend, Irene modeling the necklace. Her smiling face adds alot to the necklace, doesn't it? She said it was perfect for her - in her colors. Doesn't it look good on her? However, I did bring it back home with me. It doesn't look bad on me either.


When I went to the bead show this past May, I found some marvelous carved bone beads. I loved the detail on these beads. I bought several frogs and three mermaid beads. I also bought lots of leaf beads. I made the Garden Frogs necklace first, using only two of the frog beads. I created a triangle-shaped peyote base and added leaf and flower beads over the whole area.

My husband had a day surgery procedure last month and I took the beads to do the Mermaid Reef necklace while I was waiting. I got quite a bit done while waiting and finished it up the following week while watching television.


Last year when I was on a dragon-creating spree (thanks to Christi Friensen's book), I made this dragon and beaded the necklace with beads I found at the local bead convention.

When I travel I usually carry beading. It is one of the few artistic things that I do that can be portable. In April when I flew up to Rhode Island to take the class with Kathleen Dustin (I told about this in a previous post), I started working on the Octopus Garden necklace. I made the octopus with polymer clay using the instructions in Christi Friesen's book "Under the Sea". I thought they were cool and would make a great component for a necklace. The idea was to have the necklace look like a coral reef. I plan on adding to the necklace in a couple of weeks when I fly back to Rhode Island for my annual art pilgrimage.

Check out my Slide Show!

Check out my Slide Show!

Sunday, June 17, 2007


A little over a year ago I took a workshop with Kathy Davis. While I knew I loved working with polymer clay and I had taken to sculpting in college, Kathy awoke my love a creating dolls with her workshop. I would highly recommend her as a workshop instructor - it was fun, informative and rewarding. I'm hoping to be able to take another workshop from her soon.

In the workshop she taught for our guild, we were to create a fairy or elf. She told us the doll would let us know what it wanted to be. She was right! Mine are Forest Folk. The bigger one was created in the workshop and the little one was created later.


Zeke is now over a year old - we are hoping he is his full adult size. He is on the bigger range of border collies. At last weighing, he was 50 pounds. He's also a bundle of energy. These pictures were taken last week. The car is my husband's 87 Mustang convertible - that is me with Zeke.

For several years I've been creating candy tin purses. Purses made from candy tins, covered in polymer clay. Two of my purses were published in Haute Handbags II (if you scroll down on this link, they are pictured as Polymer Clay Critter Purses) and two were in the May/June 2007 issue of Belle Armoire in the Gallery section (and no, they aren't that orange in real life). Since then I have created a few more, including this Indian purse. The indian on this purse is an original painting that I did years ago on a wooden box for my husband (the box got first prize at the Texas State Fair). I scanned the image, removed the background and used LazerTran to create the transfer.

When I got my first package of Sculpey UltraLight, I thought it was product with great potential. I was right - it does have. It took a little getting used to the feel of it - much like marshmellow creme, but not quite as sticky.One of the great advantages of the product is being able to create larger armatures that remain lightweight. This clay goddess is from my first playing with the UltraLight. She is approximately 6 inches tall and covered with a sheet of mokume gane over the UL armature. She is also adorned with three turquoise beads.
It's been a while since I've taken the time to post. I only have so much free time and it seems that I choose to spend it creating in my studio or keeping up with emails & egroups rather than posting on my blog. Since the last time I posted, I had the tremendous opportunity to travel to Rhode Island and take a workshop from the amazing Kathleen Dustin. I have always admired her work and been inpired by it. She was teaching a workshop sponsered by The Bead House in Bristol, RI. I was able to fly on AA miles and stay with my friend, Linda in N. Providence (Linda took the workshop as well).

The actual workshop was at the Bead Annex, a marvelous facility, perfect for workshops owned by The Bead House. It is a converted luggage factory which now houses artist's studios. The space was spaceous, well-lighted and the owners very gracious and made us all comfortable.

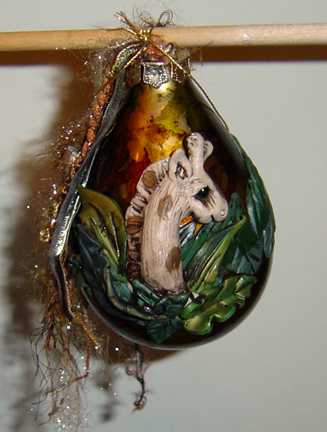
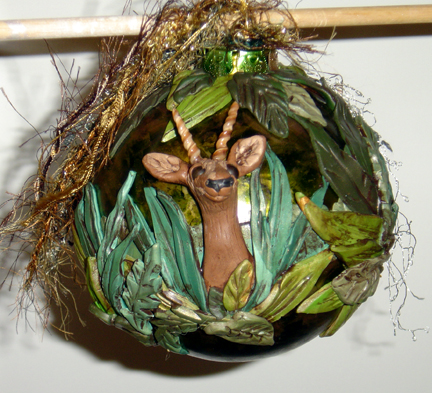
Kathleen is a very generous person, sharing her very unique techniques for her transparent techniques. It was a very satisfying workshop, which I enjoyed thoroughly and wouldn't mind taking again. Here are the three pieces I created in the workshop:


The piece on the far right is the first one I created. While it is nice, I learned from it and created the piece in the middle. I like the design of the middle piece better, it isn't as cluttered as the first piece.


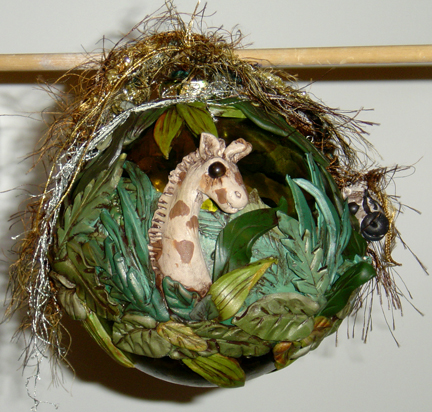
The second day of the workshop, we created a dimensional pendant with an image transfer, the piece on the right.


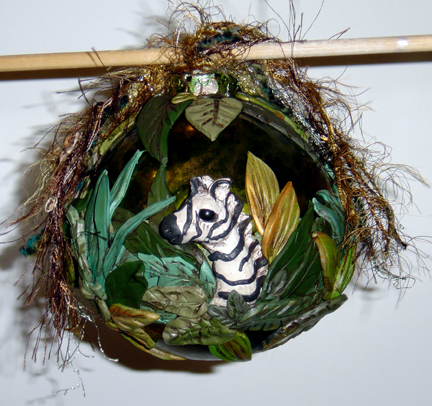
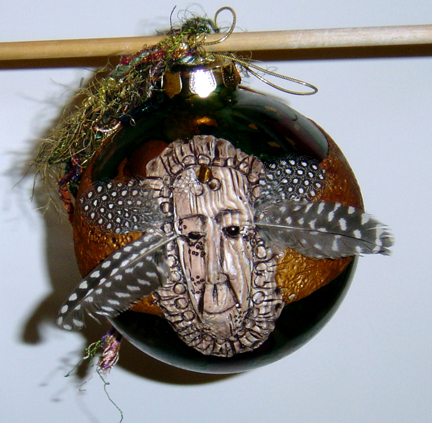
As I mentioned, I love the technique and went home and created more, all of these dimensional, two with image transfers and two without. These are the pieces I created at home.

Sunday, April 01, 2007


My step-daughter, Gina is serving her second tour of duty overseas in Iraq. She is a member of the Navy Reserves. We pray every day that she and all the other troups will come home safely. We are so proud of her.

Tuesday, March 27, 2007


I thought I would share a picture of "my boys". This is my husband, Bennie, son Josh and Zeke, the wonder dog taken this past Sunday.

Tuesday, March 20, 2007


The last deco in the RR is Susan's Butterfly-themed CD book. It was fun working on the CD - I haven't done worked on one in years. I used a verse from Train's song "go on hitch a ride on the back of a butterfly, I don't care how you get to me, just get to me".
I used some of the butterfly canes I had left from the Wings Collage I did several years ago for the show Crafter's Coast to Coast. They coordinated beautifully with the K & Company papers.

Saturday, February 10, 2007

The theme of Lin's little deco is Harvest Seasons. I found the perfect autumn quote in one of my vellum quote stacks. I drew pumpkins, vines & berries with watercolor pencils. My friend Lin draws and sketches profusely. Her blog is one my links, From the Oak.

Wednesday, January 17, 2007


One of the egroups I'm in has been discussing their studio spaces - actually I think this subject comes up from time to time on most of the artist lists. I'm very fortunate that I have a room all to myself for my studio. Originally it was supposed to be the formal dining room, but we aren't the formal dining type. There is a great 6-ft x 6-ft window on the east side of the room. Slowly but surely I've added shelves and such to fit my needs.
The top image on the left is a huge wooden shelf unit which we obtained from a surplus equipment source. The one on the right is the view from the door by the kitchen. My work table was also obtained from the surplus source. It is great - it has a heavy duty electrical plug that goes into the wall outlet to power all 8 outlets built on and under the table itself. It was a workbench from a shop. It also has a built in slanted shelf (it is kind of hard to see from the angle of the picture). The black chair is for any guest artists that come over to play. To the far left of this picture is the window. I sit on the opposite side of this table.

The next picture on the left is the view of my area where I sit. The shelves in that area go almost to the ceiling. Most of my supplies in this area are stored in cigar boxes and are within easy reach. The metal file cabinets hold polymer clay supplies. The image on the right is the branch I hung above the window to display the ornaments I've made or that others have made for me. My fairy with an attitude will hang from the middle of the branch. The branch actually twists - we found it a couple of years ago and brought it home as it was so unusual. It is perfect in my studio.

These are the pages I did in Marilynn's deco, Childhood Memories. The pictures are from Christmas when I was not quite 2 years old. Looks like most little girl's dream presents - dolls, high chair, buggy, etc. Unfortunately I was too young to remember that Christmas.

The fairy with an attitude is one that I made for myself. She will hang in my studio from the branch over the front window. She didn't really get an attitude until I added her hair - it popped out then. The hair is perfect for her (thanks to my friend Candace for the boa pieces). This sweet fairy was make for a coworker's new baby. The parents are involved with the Scarbourough fair and have done their little girl's room in forest & fairies - what a lucky little girl. This fairy is made to hang and I thought would make a perfect gift for them.

Monday, January 08, 2007


I've had requests to post recent pictures of Zeke, so here are two taken in December.

Tuesday, January 02, 2007


While I don't decorate for the holidays anymore (no children at home, work, husband usually gone, etc), I did participate in a couple of ornament contests/exchanges this year. I like to make the ornaments, I just don't do a tree. Since the ornaments I made aren't really Christmas, I can hang them in my studio all year long. I took a seminar in October with Christi Friesen, and bought her giraffe bead pattern. The lion was done as a bead in an issue of Bead & Button magazine earlier. I used the ideas to create ornaments for my local polymer clay guild swap. Christi is very open and generous (and a very nice person) and encourages people to branch out and develop their own style/animals. I developed the zebra and gazelle using the basics learned from the giraffe instructions. The three animals are done on a very large glass ornament and were for an ornament contest at work. The antlers on the gazelle are actually beads that I found at the last bead convention I attended. I believe they are some type of shell bead. When I bought them, I wasn't really sure what I would do with them, I just knew they were cool. The final ornament is another one that I did for the guild swap, this one has an African-style mask, keeping with the jungle theme.