Showing posts with label polymer clay. Show all posts

Sunday, September 19, 2010

Two Less Heads on Sticks
I love to sculpt faces and I generally have several "heads on sticks" (sculpted heads on dowels) sticking in the tool holder or in the paintbrush basin on my studio table. Sometimes it takes me a while to get around to completing the dolls.
Professor Pocus changed so many times from the original concept (and his head had been around my studio for a couple of years). Originally I intended to do a European style hobo clown holding a skeletal umbrella. The idea was to put him in the guest room when I had it painted. I sculpted his head, hands and feet and there he sat in that state for over a year.
Then I had the idea to use him in a box, he was going to be a magician with a top hat with a rabbit coming out of the top of the hat on his head. I began working on the box...but...that's not really what he wanted to be either.
The box took on a more rustic look and I added the great feet by Tim Holtz. The box dictated that he be more of the traveling snake oil salesman, so I started working on that concept.
I was doing his body out of a piece of 2x4. I drilled and glued and attached his hands, arms and head. Again it sat, not quite coming together.
Last month when the gals were over for our monthly art play day, I got the idea to carve out the center of the 2x4. I dug out my handcarving tools and started working on hollowing out the center. (Husband asked why I didn't just go out to his shop and use the power tools - heck, it was 104 degrees that day & it is an uninsulated metal building).
Once I carved out the center, he began coming together quickly. I used grunge board and dies to cut gears. I painted them and added them inside the 2x4. I also used Tim's sprocket gears. I decoupaged pages from an old book on the top hat and dressed him with mulberry paper. I found the perfect item in my stash for him to hold, one of the Industrial Chic pieces I had picked up from Michaels several months ago.
So now I'm proud to introduce Professor Pocus & his Traveling Magic Show.
The other head on a stick that had been sitting around my studio was done with an air-dry clay that I was testing (I love this stuff - I do hope it becomes available soon). I decided that I wanted a cloth doll for this one, so I got out one of my Patti Culea books, Creative Cloth Doll Couture and used the pattern from it. I made the doll body and it was too small. I had to enlarge the pattern. The second doll was much better sized.
I gessoed the doll and painted her with Tim Holtz crackle paint. I used distress inks to enhance the crackles and to give her some aged character. I choose old laces to dress her and created her boots, skirt and belt from ostriche hide. I liked the hat that I'd done for the professor so much that I took rusted sewing patterns and stamped on them to decoupage on her hat. I added a Boutique Fleur flower from the Recollections collection with lace to trim her hat. I haven't decided on a name yet...any ideas?

Sunday, August 22, 2010

Tidepool Necklace
My friend, Ellen created small sea creature beads for me for my birthday - an octopus & a few stingrays. While pulling beads to make a necklace out of my treasures, I ran into a polymer clay pendant that I had gotten from my friend, Sherry in a swap. It was the perfect color and design to go in the necklace, but not the right size. I took an exacto knife to the pendant, cut it into three pieces and shaved the edges a bit - perfect! They were exactly what I needed for the necklace. I used 4 different color/toned bead soups in creating the necklace, two turquoise/teal and two in the sandy, neutral colors.

Sunday, August 15, 2010

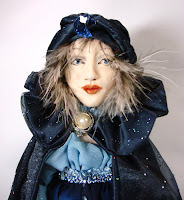
I had the opportunity to try a new clay released by Polyform called Living Doll. I LOVE this clay. For me it performs perfectly for sculpting my art dolls. I created the face of this doll the first time I used the clay. I decided to finish her and donate her to the Enchanted Doll Artist Conference as a banquet centerpiece doll, which are auctioned off as fundraisers to help defray the expense of the conference. She became the Gypsy of the Moon.
Fish Workshop
At the first of the summer, my friend, Ellen taught her very first workshop and she showed us how to create the fabulous fish. I really enjoyed this workshop and created 6 fish! I plan on making a mobile with them to hang in my studio. Aren't they fun?

Friday, February 12, 2010

Valentine's
I hadn't played around with altered or paper arts in quite a while. I decided to do some items for Valentines this year. The first picture shows altered recipe boxes. I got the recipe boxes from the Fun Finds section at Michaels. I sealed them with gesso and had fun with several different types of paint. I stamped and embossed, added grungeboard embossed hearts, rusted jewelry components and stamped shrinky dink images to create a less traditional Valentine. I filled them with chocolate and travel size lotions, bath gels and such to give to my friends.

I also did some bookmark tag Valentines with hearts. I covered the tags with decorative paper, did some stamping, some masking, inked the edges, added hearts, ribbon, Prima flowers and such to make more non-traditional Valentine's.

One of the art doll egroups I belong to did a Queen of Hearts swap. I used a dollar store porcelain doll as the base for my doll. Her wings are wire and screen, she is covered with tissue paper and painted. She has stamped embellishments and a brass pressing crown.


The local polymer clay guild meeting is on Valentine's Day this year. Our swap theme is nature, so I did the turtle pins. We are supposed to wrap our swap items and I thought since it is Valentine's, I would wrap them appropriately. I made pilow boxes from red gloss cardstock and added Prima flowers and ribbon.
Bird Wedding Cake Topper
One of my coworkers is getting married later this year and she wanted birds for her wedding cake toppers instead of the traditional bride & groom. I made her the whimscal cake toppers as my wedding gift for her.
ELVES
I made elf ornaments last year for my coworkers for their Christmas presents. I'm just now getting them on my blog because unfortunately I thought I had moved the images from my camera to my computer before deleting them, but obviously hadn't. Luckily my Aunt took pictures of them and I was able to get the pictures from her. These are polymer clay over aluminum foil balls. I made two for each of my coworkers, as the both have two small children.

Sunday, January 03, 2010

I always have time to create over the holidays and this year was no exception. At first I wasn't sure what I was going to do, but looking around my studio, I noticed several body-less heads and decided to complete them. These two heads are from the workshop I took from Joyce Cloutman this past summer.
The first little head was turned into a tree-doll ala Cyndi Mahlstadt's style from the workshop I took at EDAC. The birdcage is actually a pendant that I found at Michaels from Blue Moon Beads (I don't remember it it was the Tokens or Lost & Found line, but it was one of those). When I saw the birdcage, I knew I wanted to use it on one of these tree-dolls. The little birds are also from Michaels.


I decided to make a wired body for the 2nd head and turned it into a little forest elf. I gave him a bit of a belly. His hat is a piece from a potpourri blend with little acorns glued on top.
His hair is tuffs of rabbit fur and his shoes are polymer clay.
Now there are a few less body-less heads in the studio.

When I made the ornaments for my co-workers, I made an elf face for myself and this was another of those body-less heads floating around the studio. I thought maybe I would try doing a cloth body for him, so I used a pattern I had which seemed to be the right size. Once I made the body, though, it reminded me of a frog. That gave me the idea to paint the body green and add spots and create a frog-elf. I added spots to his face as well.
When cleaning out this weekend, I found the silver leaf server. I think it works great as a "pad" for him to sit upon. I'll have to color it with alcohol inks to get the right color.

Sunday, December 13, 2009

At work we have an annual ornament competition (mainly to decorate our department tree). This year we were each given a clear glass ornament and a prize was given to the most creative ornament. Originally I was going to do an elf face, but felt that wasn't creative enough. I came up with the idea of doing a naughty/nice ornament. I knew I wanted to have the naughty side sticking his tongue out, unfortunately due to the hair, you can't really see the expression on the eyebrow. One side is nice & one side is naughty. I had to do one face and then bake the ornament and then do the other face. The biggest challenge was to get the ears to look good from both sides - I'd sculpt one side & it would look good, but it would mash out the other side. Once he was baked, I had fun finishing him - the stocking cap is the top from a sock. His hair is a strip of rabbit fur. He was really fun to do - oh & I got first prize (a gift card, which I took to Michaels & got a great book on painting fairies, angels & mermaids in watercolors).
Wow, how time has flown, it seems like just yesterday it was Halloween and now Christmas is just around the corner. How does that happen? Every year I think time accelerates between October 31 and December 25. Well, since I just slept a time or two since it was Halloween, maybe I should start there. I signed up to take an online class with Pattee over at Odd Dolls on the ning network on creating a witch's face back in October. The original class concept ws to put the witch's face on a small canvas, but I decided to put my face into a book - Book of Spells & Potions, complete with a niche for the potion bottles and miniature spell book.


Pattee is a fabulous teacher, her videos are just like taking a class from her in person and she not only goes into great detail, covers every single step, but also gives you other option ideas. I highly recommend taking an online class from her - in fact I've just completed another class with her, a little whimsical pod creature and she even gave us a bonus extra of a holiday pod ornament! I haven't had a chance yet to sculpt either of those, but I promise as soon as I do, they will go up here.

Sunday, October 18, 2009

Well, the three of us art wanderers were off again - this time in September to the Lone Star Polymer Clay Retreat in League City, Texas, which is between Houston and Galveston on the Galveston Bay. We arrived on Thursday evening so we had some time on Friday to view some of the local sites before the retreat began that afternoon. First we went to a delightful bead shop, The Bead Boutique in Webster, TX. We spent 2 hours and $$$ while we were there & found some fabulous beads & findings. Then we were off to the Kemah boardwalk for lunch. The weather was cool enough that we were able to eat out on the deck overlooking the bay at Babin's.


After that we had a great time at the retreat with classes from Kim Cavender, Dayle Doroshaw and Barbara McGuire. I didn't get a picture of us with Barbara, but I did get pictures of us with Kim (on the left) and Dayle (on the right).

Friday, July 03, 2009

Joyce Cloutman is a member of our polymer clay guild and she attended Donna Kato's workshop earlier in the year. She gave Donna an adorable elf that she had made using canes from a previous workshop with Donna (unfortunately I didn't get a picture). She also had this little guy pictured on the left & we all feel in love with him. Pictured on the right is Joyce with another one of her cute little elves.

As workshop chairman, it is my responsibility to schedule workshops for our guild. After much urging by the members at Donna's workshop, I spoke with Joyce about coming and teaching a workshop for the guild this summer. It took much convincing on my part, as Joyce had not taught before and wasn't confident about doing so. Let me tell you, she had nothing to feel insecure about! Her workshop was last Saturday and it was fabulous. She broke things out to make it easy for each of us to create our own "Butterfly Elf", was very gracious and giving and also shared many, many invaluable tips & techniques that we will be using for years (got to make one of those curing boxes, especially with this 100+ heat).

While I don't have a picture of the finished project we did, I do have pictures to share of some of Joyce's adorable elves, all but two went to new homes, as the members purchased them.


Don't you just love the sweet little faces on her elves? Plus the detail is fabulous! Lucky me, Joyce generously gave me the original elf that we saw, the one on the upper left of this post.

I didn't finish my elf, but I did make two faces at the workshop. As soon as I get a chance, I'll finish them and post them. Neither little face wanted to be a butterfly elf, they have other things in mind.


Sunday, June 21, 2009

Lisa & I started a tradition (though not required) last year when we exchanged handmade gifts prior to attending the Enchanted Doll Artist Convention. She made me a fabulous handmade book that I use to chronical my EDAC journey and I made her a traveling tool case.

This year our dear friend Vicki is joining us (for more fun!) and I made the three of us purses to carry. They have polymer clay faces with beading around the faces, done on rayon batik. We'll be able to carry our wallets, cell phones, room key & lipstick in these lightweight bags.

I got the idea to do us traveling sewing kits for our pins, needles, etc. I found some canvas fabric and drew the faces (just like I did the shoes) and colored them with Prismacolor markers. I then used heavy duty iron on interfacing and backed them with felt. I sewed bias binding around them & added ribbon to tie them.

I also found some great luggage tags at Michaels and personalized them for us with our images.


We are all very excited about attending the conference next month! More about it later.